Needlework, Finishing, Designing, Quilting, Some Discoveries and Adventures in Stitching from Windy Ridge Designs

Showing posts with label DAR. Show all posts

Wednesday, October 3, 2012

What Does It Do When it Has Five Leaves?

I have a patch of clover in the back yard.  Well, one of many.  These are patches of clover that Southern States did not kill when they sprayed herbicide on the cornfield next to my property and allowed the spray to drift all over my yard - where my dogs go; where my child goes; where I go.  Anyway, I discovered this patch quite by accident one morning when I bent down to pick something up.  There were some four-leaf clovers, but there were also these  . . .


A few weeks ago, I took a weekend and cleaned up and rearranged my work space.  I have it  in the guest bedroom until other space becomes available in the house.  So, here is a peek behind the curtain . . .

 
I used to sit at my sewing machine, facing the wall; now I can look out the window and enjoy the view.  That doesn't really help with the rest of the configuration though.  It actually makes it a little more unweildy.  But, I have high hopes a new space will come free soon.


In the wasted corner, I've got a spot for Buddy to lay on the floor - he usually has to be as close to me as possible mostly with his head resting on my feet.

   A wider view.

The work table; fortunately, the ironing board slides right underneath.  Just under the window I have a bookcase chock full of quilting, sewing, and needlecraft books, magazines and pamphlets.  The plan was that would actually be seen, but I ran out of space.


The decorating theme in this bedroom is Americana.  You can see some hints of it here in these pictures.  The most atrocious gaff, however, is the paint color on the walls.  We are just the world's worst at painting, so we put it off and put it off.  I know this may sound counterintuitive with Americana, but I was thinking a nice brown would set things off.  The quilt, hanging on the bottom of the ironing board is one I made and quilted.  I am quite unhappy with the quilting, so hope to one day undo it all and take it to my long-armer for a proper quilting job.  My most recent tool acquisition can be seen sitting on top of the cabinet in the window.

I have wanted an Oliso iron for something like four years.  My current iron gave up the ghost as far as steam went and I've been working on a project that really needs steam ironing.  I spent a lot of money buying the iron, got it home, pulled out the manual and read and stopped and went, oh, I'd better talk to hubby about this.  The manual said that so many amps were drawn when using the iron.  You don't usually see that kind of language in manuals for electrical things; I mean, they don't usually feel they need to inform you of a units amperage.  I was curious why they would do that and felt I should not continue until I had consulted my own personal Electrical Engineer.    The geek hates to read stuff - especially manuals.  Mostly because he's a man.  But also, I have found, engineers are a little know-it-all-ish and feel manuals are beneath them.  But, mine read the manual when I asked him and he got to the part about the amperage and he looked at me and said, "You haven't used this thing, have you?"  I knew my instinct had been right.  Basically, he told me, we would have to turn everything else off that is drawing power on the circuit that I would plug the iron into.  Since my workroom is in a guest bedroom, then that pretty much means almost everything upstairs with the exception of the washer and dryer which have their own circuit.  So, until we can run a circuit for the iron - and only the iron - to run on, I have a very expensive paper weight.  Sucks.

I finished a project today that I've been working on since January -
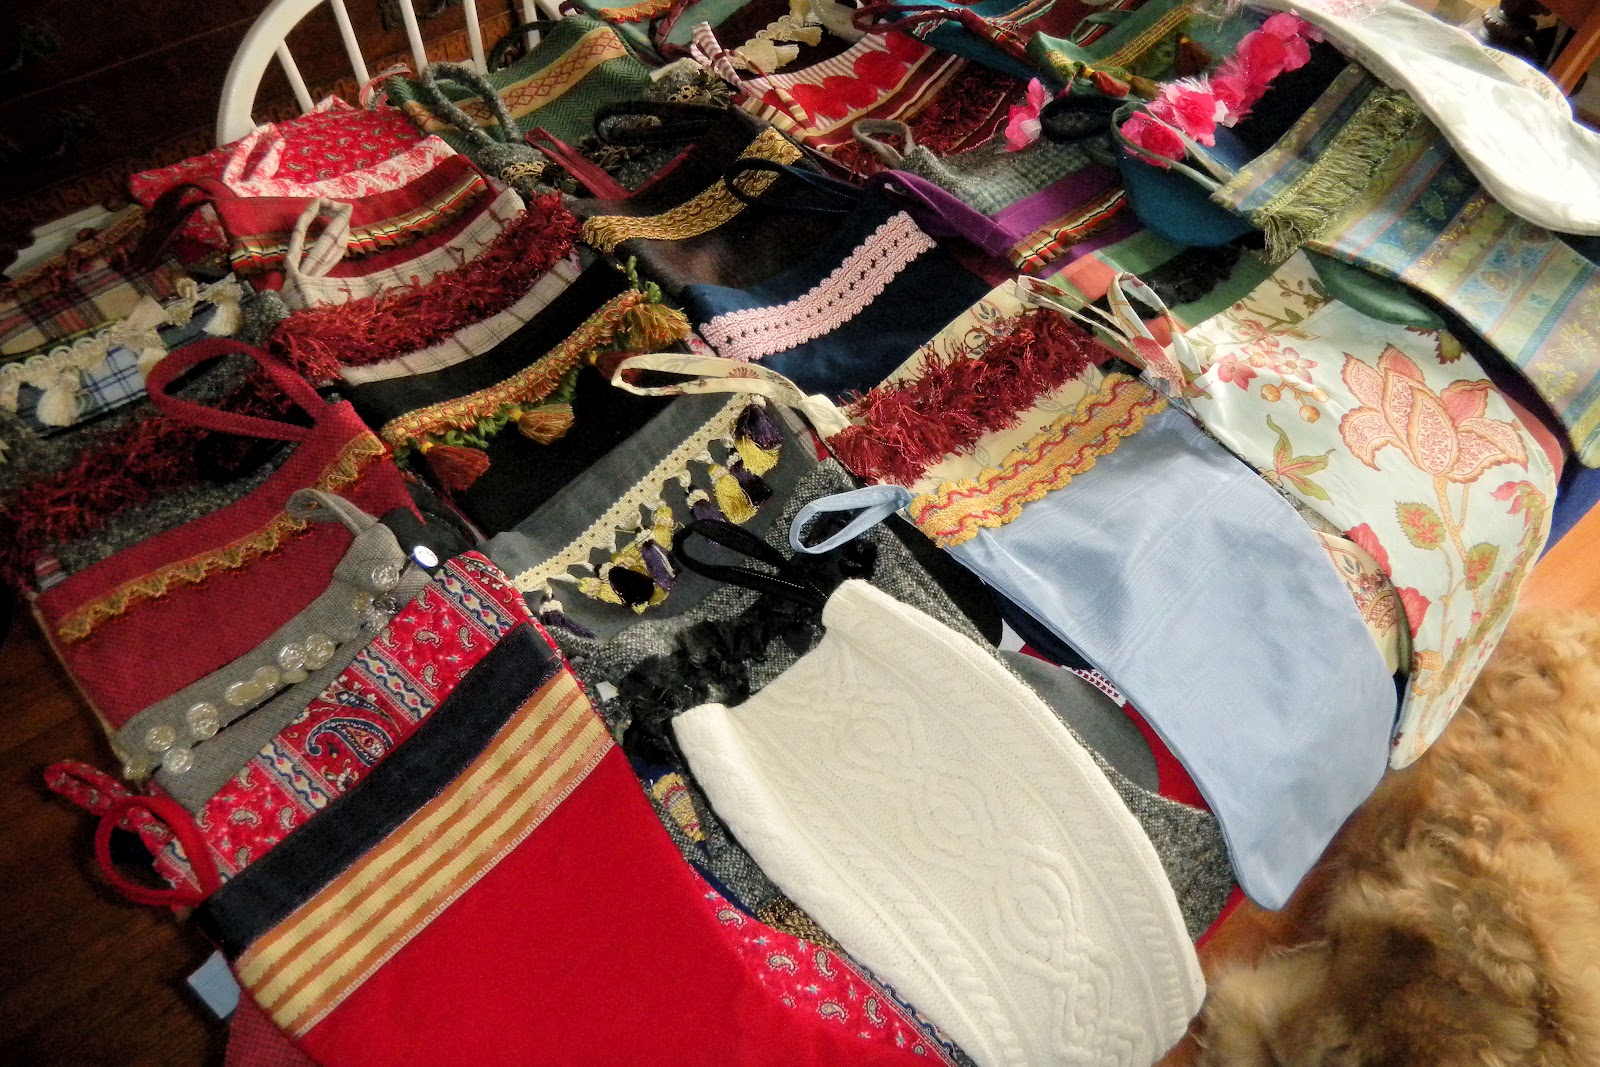

My DAR chapter supports a unit at the local VA hospital.  The unit is called CAT-5 and is for vets with alcohol and drug dependence.  These guys have hit rock bottom; so far down that even their families have given up on them.  I don't judge the families because I haven't walked a mile in their shoes.  But, at Christmas-time, we try to bring these folks a little cheer.  Every year we stuff stockings with sudoku books, playing cards, socks, canteen chits, etc.  Chock full.  And the staff at the hospital put the stocking out for them at Christmas.


End of last year, I volunteered to do the stockings this year.  They were made out of a lot of wool yardage that I'd felted, a lot of upholstery and home dec. fabric that I had in my stash, and some things that I picked up at yard sales and thrift shops throughout the spring and summer.  The biggest deal was getting the trims that went on them.  There are 100 stockings (I recounted this morning) and no two are exactly alike.


Finally, I mentioned the Quilts of Valor program.  I email-exchanged with the WV/VA regional contact and found out for sure that in order to participate now, you don't need to work through a quilt shop.  That was a big hang up last time I looked into this.  I talked to my Regent last night about the program and us -as a chapter- getting involved and she wants me to bring it to our board meeting in January.  I did go and get some material for that quilt in the Fons and Porter September/October magazine -


The fabric in the middle, the tan paisley on navy - that one is for the inner border.  The stripe on the bottom is for the outer border.  I love the way the tan paisley plays with the navy paisley that's going to be the "field" portion of the "flag".  I also love how the leaves in the red fabric read like stars.  I don't know the final destination for this quilt.  It may end up being for my own son, who is a veteran; or it could go to the chapter project.  I guess I'll have to see how much I get done and how that January board meeting goes.

A final shot - this is Leamann Mill north of Hagerstown, MD.  A gift/decor shop is run out of it now.  I just love old mills and love it when they are repurposed. 

Saturday, September 15, 2012

This One's For You - Deb! Or - How to Make an Easy Cathedral Window Quilt

Back in June (sheesh, I cannot believe it's been so long!) I was whining about my quilt blocks not coming out right.  Deb Roman at Threadgatherer wrote me an encouraging email and gave me a terrific tip - GO BIG!  I did and it worked out incredibly well (see posts on the Path to the Civil War Quilt).  In the course of our email conversations I mentioned an easy way to do Cathedral Windows and I tried to explain it in words.  I was a dismal failure.  Pictures really are necessary.  So, I have finally gotten around to getting some pictures.  They're not the greatest, because it turns out I'm not so good at one-handed photography, but I think you'll get the picture (ha ha ha!)

The directions were originally published in an Austrailian Quilting magazine back in the '90's.  Yes, that's how long the project I will mention later, has been in the works.  Shameful, I know.  I just want you to understand, this isn't my original idea.

What you do is cut a bunch of 2.5 inch squares.  In my "finished" piece, my squares were 2.5 inches, but you can use whatever size you like.


Take two of the squares, fold them in half diagonally and press.  Take a 3rd square. 


Place the folded squares on top of the 3rd square so that the folds bisect the 3rd square diagonally.  I think that the original instructions said to tack the corners of the folded squares, but I wasn't patient enough for that, so I am pretty sure I pinned them.  


 What you want to be sure to do is get those folded corners and the corners of the square caught up when you sew a quarter inch seam.

See below how all the corners are there in the same place? 


Then you sew that seam and when you open it up it looks a lot like fabric oragami - or you think you've done something wrong.  But you haven't.  You have to make a bunch of these sets.  The you sew them all together to make the base that you are going to set the windows into.

Because I only had so many scrap squares, we're going to pretend now that I've built the whole base.  But YOUR base will be the finished size - plus seam allowances - of your project.  After the base is done, you have completed all your machine sewing.


You set in your window - usually a contrasting fabric or color, cut to the same size (2.5 inches in this example) as your base squares.  See how it's on point, so that the sides of the window match the direction of those folded edges?


Now remember, these are the steps that you're doing after you've finished making your base.   With your finger in the middle of one folded edge, peel it in toward the window so it arcs.  At this point I use applique pins to hold the "peel" in place.  Then, you hand stitch, using a blind stitch, and secure that peel in the place you want it.  Stitch from one peel to the next and remove your pins as you go so you don't stick yourself. 

 If you're confused, see how there's a little pocket under that folded edge?  What you're doing is securing, either by machine or hand sewing, all the raw edges.


For my piece, I ended up making a base that's about 2 and a half feet long by a foot wide.  You can see the "finished" piece at the right and above, a closer view where you can also see the back of it.
The edges are done by using whole windows and then you just trim away the excess.  Corners, same thing - as you can see in these pictures.


Finally, here is a closeup of the windows.  I just love the curves that the all the peels give it as a secondary design.  This piece will become a table runner tomorrow; my sewing time has been cut short this week.

Labor Day weekend we had the shed broken into.  Well, the other night they came back and tried to pull off the siding to go into the side of the shed.  Can you believe that?  They want that rototiller bad!  So, we had the alarm company out yesterday and we've devised a new way to protect it.  But, sadly, there was no stitching time involved because I had to make decisions and shepherd the alarm guy back and forth.  Sigh.  Today I had to catch up to yesterdays chores and that left very little time for sewing.

However, I have been working on some projects that I (gasp!) haven't been sharing much about.

First, I got the September/October issue of Fons & Porter and it had the directions for the quilt I fell in love with when I watched the Quilts of Valor program on PBS.  So, I took my punch card to my quilt shop (Wilson's in Hagerstown) and got some fabric.  I LOVE it!!!

 On the red fabric, those a little cream and blue leaves, but they make me think of stars. 


I collect flag or red, white and blue jewelry and wear it to my DAR activities.  But, I also think it's pretty to look at.  My guest bedroom is Americana themed so it's in there - along with my work space.  So I made a shadow box I can stick them into so I can enjoy looking at them, but also get them when I want to wear them.  A quick sweep with a paintbrush keeps the dust at bay.


I finished the stitching for the Blue Jay ornament.  Now I just have to put it together.  I actually feel like I'm accomplishing something.  Last weekend I cleaned up and rearranged my work area.  I have also been doing some stitching experiments I want to share with you in the next week.  Right now, I've got to go cook supper!  Hope you enjoyed!


Monday, September 3, 2012

Experimental Quilting - - - and other tales

So I went up to my aerie Saturday  to fool around with fabric.  I had started the morning, early at 6 a.m., as I usually do; with a cup of coffee and the Fons and Porter show on PBS.  This particular show was tips and tricks for long arm machine quilting.  Generally I find these shows that they do really, really boring as I am not - nor ever will be - a long arm machine quilter.  I delete the show and move on to something else.  This time, however, I decided to let it run while I drank my coffee and stitched.  Who knew, I might see something interesting.  No sooner did I have that thought when the show opened with the camera on the long arm quilter lady and all I could see was the quilt on the wall behind her.  It was patches of multicolored fabrics surrounded by white.  Just looking at it I knew it had to be dead easy, I just had to figure out the block configuration.  I sat there with the show on pause and did sketch after sketch - about four of them, before I got it figured out.  First thing I did in my sewing room was try it out.


 I worked it out that the white strips are 2.5 inches wide and the center strip is 4.5 inches wide.  They get cut at 8.5 inches long so that they end up making 8 inch blocks.  Then you just alternate how they are turned.  The overall effect is something like the photo mock up below, they just had all sorts of various colored (printed?) fabrics as the center pieces.  It was SO pretty!  I've already got about five different batches of fabric set up so I can start whipping this quilt out!


So, after that worked out so well, I started on the next thing which was based off the Quilts of Valor show that I recently watched on PBS.  I've known about the program for several years and tried to get involved before, but have no quilt shop that is participating.  I am now going to get into that and figure it out, because now I really want to get involved.  I particularly loved Mark Lipinski's quilt in the show which was a drunkards path/ohio star combo that made like a flag quilt.  It was GORGEOUS!  I had done a drunkard's path block in the Civil War quilt (Path to the Civil War) and it had come out really well - much better than I'd expected to be honest.  So, I knew it wasn't beyond my ability.  Now Lipinski was showing a "quick" way on the show to do the drunkard's path - no pinning, no matching, blah, blah, blah.  But, he only showed the beginning who was sewing with him, not the camera.  So, I tried it anyway.  Here are the results:


No so good.  So, I went back to the way I did it before - the F & P method of the three-pin-hold (sounds like I'm wrestling doesn't it?).  One pin on each end and one to match the centers of each piece.  Here are the results:


 Top shows the pinning method.  Middle is the finished and ironed block on the right side.  The nice thing about this method is that I don't do any cutting, I just press the wedge seam outward, toward the bigger portion of the block and it just opens up.  Makes it pretty fast!  So, there is one of those quilts in my future.  THE BEST NEWS - is that the quilt, with all the directions is featured in the September-October issue of Fons & Porter Love of Quilting magazine.  I would put a picture up, but I forgot.  I'm going to get my DAR chapter involved in the Quilts of Valor program too!

Next was this big pile of scraps from the Path to the Civil War quilt.  The pile was about eight times bigger than in this picture (cause I forgot to take a picture when I started):


 These were all leftovers of squares, triangles, flying geese, some mismeasured pieces, etc. etc. and I just thought, what if I try to make something out of this . . . .


 Above you can see a bunch of stuff slapped up on the design wall.  My design wall is not nearly so nice as Jackies (whose style I am totally planning on copying).

 Here's the low down on what I did.  I slapped stuff up on the wall and tried to make it fit.  However, these blocks were all sorts of different sizes and fabric cuts, so not everything fits together so well.

Here for example, you can see I've got an open spot where the arrow is pointing.  So I took those extra strips and squares that are hanging about on the design wall and sew them on - sort of a log cabin style.


I sewed the two block strips together, but they're still going to be short of the same height as the block set to the left.


Added the strip and was then able to sew the
block set to the left onto the one there in the center that I'm holding.


Now you can see they're sewn together and I just have to square it up so I can go on to the next piece in the puzzle.

Well, after two days of this I finally ended up with a pretty nice top for a table runner.


 There it is, all finished and ready to go; the binding will end up being the outer border.  I'll have to think about what color and what fabric I want to use for that, but can do down the road.  Now that picture I started with earlier is the pile of scraps that I actually threw away when I was all finished.


 I had two "squares" left when I finished the runner top and so I made them into pincushions.  Here they are stuffed, but have to be sewn closed.


Next I wanted to see about how accurate my feet sew.  Above is the all-purpose foot that sometimes I forget to change out for my quilting foot.  See how it's riding the edge of the fabric, and where the fabric is on the throat plate?  Well, below is the quilting foot.


It is riding the edge of the fabric and you can actually see into the throat of the machine.  Below is a measurement.


The quilting foot stitch line measures at exactly one quarter inch which the all-purpose foot measured about 1/16th of an inch bigger.  I have learned my lesson Deb - only quilt with the quilting foot!


Next up is a wonderful Give Away that I won from Nancy over at Victorian Motto Sampler Shop.  She's having some more terrific give aways now, so go and check them out.  Tell her I sent you.  And, thank you again, so much, Nancy!  The background fabric is a top that I purchased at a thrift shop.  I think it is Indian in origin - and it is handmade - hand embroidered too!  Sadly, it does not fit me.  But, it is in the colors of my granddaughter's room, so it is destined to become a pillow case that will be among her Christmas presents this year.  No sense in letting good embroidery go to waste.


I have a Give Away of my own - this is fabric I have hung onto for years and finally decided that I will never, ever use.  The bulk of it is feedsack material.  One is actually still a sack!  One piece measures about 3/4 of a yard, but the others - except for the one that's a sack - are about one yard.  Then, there's a bonus piece of material that is just cotton and about 3/4 of a yard.  Be a follower, post on your blog, recommend to a friend - and let me know about it all on this posting.  I will draw a winner on the last day of the month.

Finally, something pretty that I had a heck of a time capturing with my camera because she's shy - an Eastern Swallowtail butterfly on my butterfly bush.

 Hope you enjoyed!

Friday, May 27, 2011

Happy Memorial Day Weekend

I've been slogging away on The Chase for the last few weeks.  I'm moving on to something else this weekend, just until the 1st of June when I go back to AotH.  First, how many of you think that The Chase is two deer chasing each other across the greensward?  I have raised my hand along with you.  Here's an image from the cover of the kit ...


I decided that I'd do a bunch of the grass instead of leaving all of it until the end to do because that would be REALLY boring.  So, I'm stitching away at my grass, which I know, looks different from the grass on the original.  I don't think it's better or worse, I just think it's different.  I also thought that it was best to work from the background out - do the stuff that is supposed to be furthest back and then stitch things on top of that, or, I guess, forward of that?  You know what I mean - so that it gets a more dimensional look.  Anyway, got around to stitching the deer.  One of  the deer is done with two colors.  I decided to do that one first.  I had given some thought earlier on to switching the doe and stag.  But, decided that the stag's antlers would come too close to the leave on the tree.  Well, girls chase guys on Sadie Hawkins Day, right?  I left it alone.

It wasn't until I was actually stitching the "doe", concentrating on not messing up the two tone effect, that I realized she wasn't a doe at all.  It's a dog - and that's what The Chase is all about - a dog chasing a stag.  So, Siobhan, get your smart phone out and ask it to pronounce this word: D-U-H !!!  Oh, my goodness I felt so dumb when I realized that the two tails were different.  But, both of them were supposed to be stitched with the same threads (albeit the dog was done in two tones).  So, even though I said I wasn't going to, I actually did make a change.  First of all, I tried to give the dog a more dog-like head.  The head drawn on the linen was almost exactly the same as the stag's.  That made it fit the ears better.  Then I replaced the stag's colors (taupes) with DMC 975 and 976 which I think are golden browns (yep, just checked - light and medium golden brown).  I thought they were more deerlike colors.  I also added a bit more cream on the tail and ears - where there was none called for.  But, that's it!  I'm not changing anything else!  Here's my overall progress this month:


When we went to Woodlawn Plantation I picked up the Sandra Sullivan design - Ferry Farm and stitched it up.  It wasn't on my list of things to do, but I snuck it in there anyway.  It was pretty quick, about three days worth of stitching.  It's been finished awhile.  I wanted to put it into a frame I knew I had, but I couldn't find the frame.  I knew it would look great and it does!

Here 'tis!  It is stitched on 40 count New Castle, white.  The frame measures 4 inches by 3 and a half inches.  At the bottom the design said WASHINGTON.  But, I decided that this was supposed to pay homage to Ferry Farm and I could just fit it in.  The Washington family members are nodded to through their initials.  Colors not changed, initials the same, just put in the farm name.  I love it.  Will keep it on my desk.

Finally, I've got another one off my finishing list.  It's my own design, The Bee Line March Sampler.  Framed so I can photograph it and get the charts put together.


Many of the same elements as the box I designed for the DAR competition; added Washington's Headquarters flag, the leaf border - they all represent trees that would have grown in the forests the men hustled their way through between Shepherdstown and Cambridge - and the map indicating the general path they took.  Have a great weekend - Hubbs and I are doing something fun tomorrow then work, work, work on the house.    Oh!  Forgot one thing.  Does anyone know what kind of linen that is that I'm stitching The Chase on?  I need to get ahold of some - blank and don't know what it's called.  Thanks!  Hope you enjoyed!