Needlework, Finishing, Designing, Quilting, Some Discoveries and Adventures in Stitching from Windy Ridge Designs

Sunday, July 8, 2012

Another Milestone on the American Sampler

Progress of Late

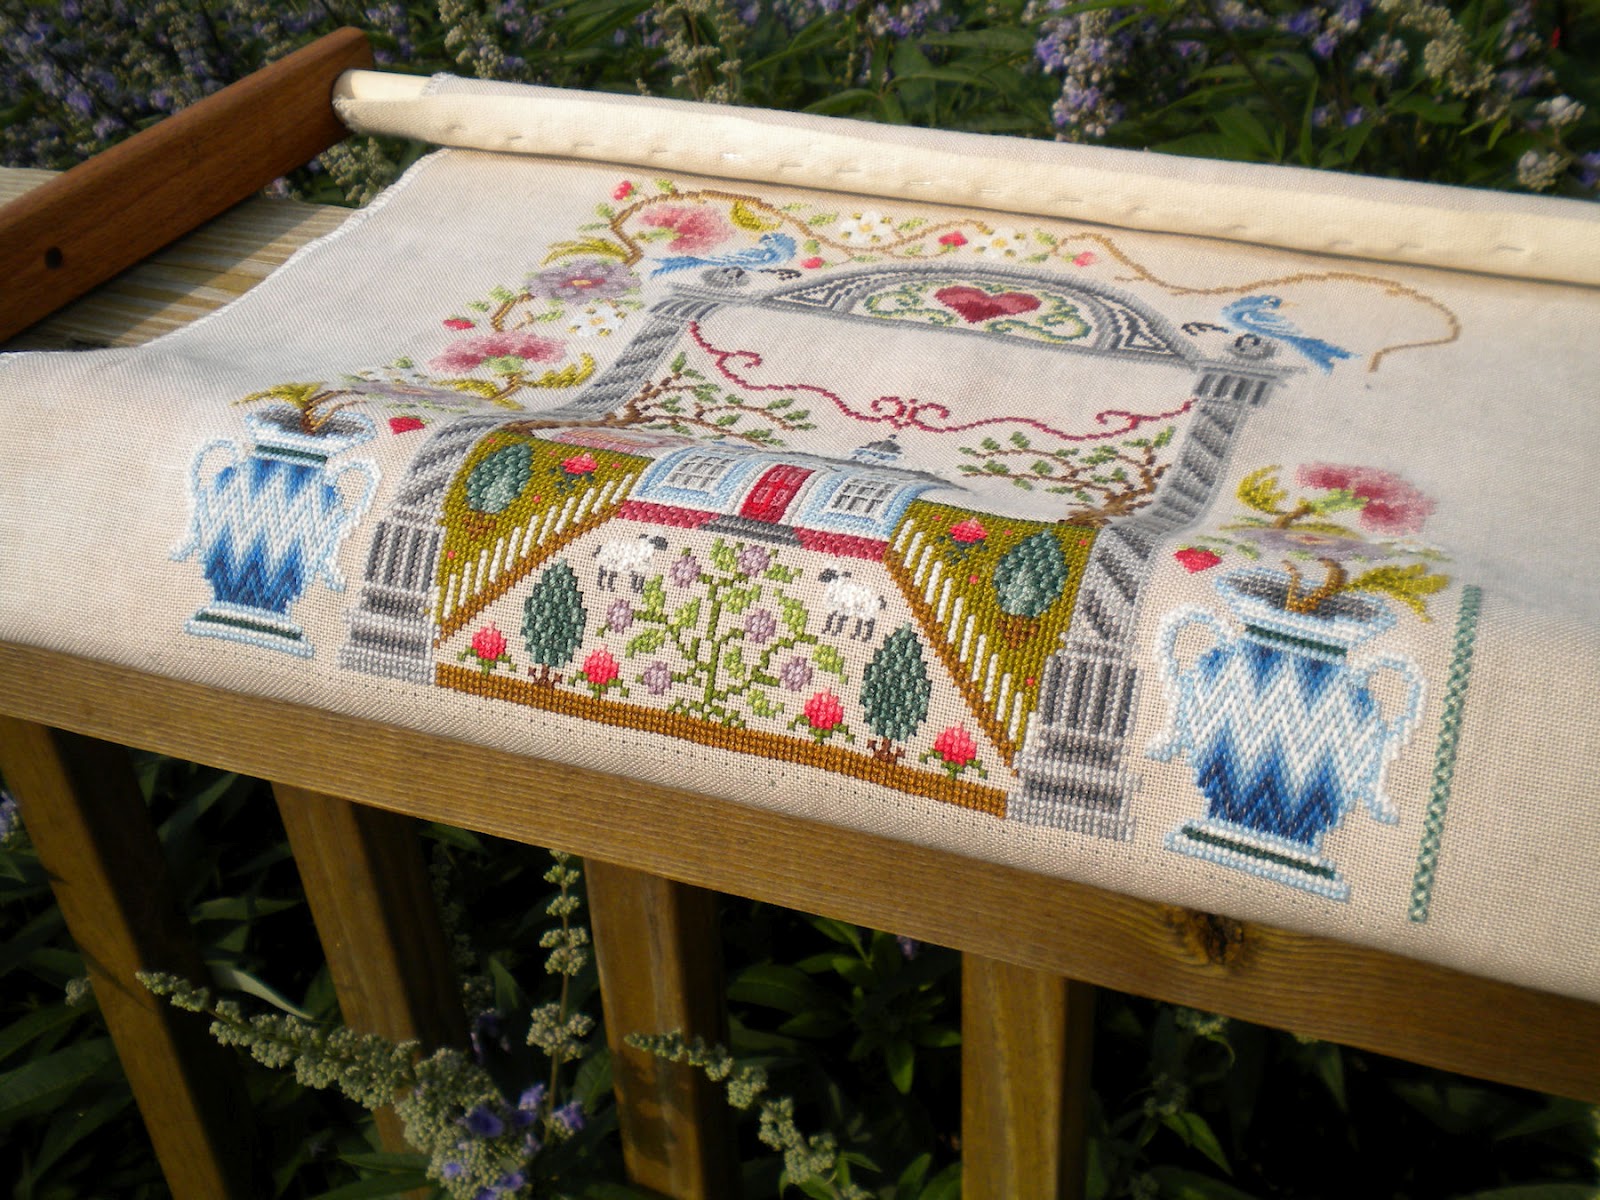
When I last showed you the American Sampler, I was working on the flowers that go up the side margins of the sampler - in the Queen stitch.  I finished those up early in the week - after we got the power back on.  Then I moved on.  I worked some more on the outer border that's done in Rice stitch.  To do the stitch, you make a big cross stitch, over four threads and then do little legs over two threads on each of the big legs.  In this sampler the Rice stitch is done sometimes all in the same color, other times, in different colors.  You'll see right off that I've got a glaring mistake in the center.  It was supposed to be two Compensating Rice stitches over six threads, but when I got there it ended up that somehow I'd added a stitch (or two more threads).  And I wasn't going to undo all that work.  If I'd known about it in advance, I'd have made the checkerboard pattern run uninterrupted, but as it is, I have Compensating Rice stitches over eight threads instead.  Sigh. 

Then I went to work on the Colonial Gentleman who has come calling.  I'd not done him before when I was working on the central area.  Guess I wanted to savor all that over one stitching at a later time!  HA!  Spent the last three days putting him in.  In the original design, he has a hat in the crook of his arm.  I left him hatless, however.  I decided I didn't want MY Colonial Gentleman to come courting "hat in hand" - so to speak.  How undignified.

Here is the view now of the central design:


They make a lovely couple, don't they?  Also, I realized I'd made another mistake - on the fencing.  Before, it was only posts - no actual fencing.  I looked back at the chart and sure enough, the areas between the posts were to have been worked over one and two over-one crosses in each "between" section was supposed to be white - to make rails.  Sigh!  So, I used one thread and top-stitched the rails in.  At least now the sheep will be contained.  Ahead I will begin doing the fill work on the side panels - don't want to get stuck doing ALL of that at one time - and the last section at the bottom.  Seems I must finally decide what words I'll be putting on this sampler.

I went to a favorite antique shop last week - or the week before.  Found some nice stuff.  One thing, was rolled up into a teapot and the teapot was sitting in a corner of a shelving unit - the thing was just sticking out the top of the teapot.  BUT, I recognized it as linen.  So I went over and picked it out to find -


Viola!  A Pre-Printed Schoolhouse.  It's probably from around the 70's and had been started.  Someone had begun the alphabet with 6 strands of black floss.  It was a rat's nest of tangles on the back; I had a heck of a time pulling it all out - took me a whole evening!  I have been collecting variagated threads from various old sewing baskets I've picked up over the years, looking for just the right project to use them on.  I've decided that this is going to be THAT project.  I will put this into the rotation soon.  I seem to be finding a lot of pre-printed things lately; they're hot!  Maybe it's because it's summertime?  Are they making a comeback?  Anyone know?

Speaking of hot, Washington DC set an all time (for the date) record high temperature yesterday of 105!!!!  Out here we were roasting.  Our high was 101.7 - almost 102!!!  I think that was an all time high for the time we've been living here.  I just spotted huge clouds coming over the mountain and checked the radar online - they're headed our way.  They herald the coming cold front that will take us back down into the 80's for the coming week.  Ah, R E L I E F !

That's it for this time; hope you enjoyed!

Monday, July 2, 2012

Practicing "Cup is Half Full" (or - LUCKY - very very Lucky)

On Friday I went to the grocery store.  My total was $146.  And then the checkout machine froze up and my order had to be transferred from one checkout machine to another.  In the transfer process the total changed to $106.  I pointed out that the amount was wrong - honestly, I did.  And the assistant manager doing the ring-up told me that this happens all the time when they have to transfer - it gives folks their bonus points again.  So, that was one.

I won one of the items in Nancy's Grand Giveaway - buttons!  Whooooo Whoooooo!!!  I'm excited.  That was two.

And then there was the storm.  We sat and watched from the front porch as it approached.  The most amazing and spectacular lightning I've seen in my entire life!  But of course, there were people and property under that lightning.  We went inside when the storm finally arrived at our house.  Within minutes, we had no power.  That lasted until late yesterday afternoon.  And God, it was HOT!  But, when we went out to survey the damage on Saturday morning, we were amazed to see that there was not  one bit of damage to either the house or the shrubbery.  That was three. 

If the town had electricity, I'd have gone and bought a lottery ticket!

We have decided that we'd much rather be out of power in the winter.  When it comes to heat, we are total wimps!  By noon yesterday, I'd reserved a hotel room for the rest of the week near where my husband works, that was pet friendly so we could take the dog.  We'd been soaking him down with the garden hose umpty ump times during the day to keep him cool.  He's very happy the AC is back too!  But, there are still more than 6,000 folks without power in my county - down from more than 20,000.  We're part of that 1.5 million that you keep hearing about in the news.  I also haven't heard about damage in Indiana where winds were in excess of 91 miles an hour.  Here they were only 75 mph.

In spite of the fact that almost all we did was sit around, run the generator, water the dog, go out to eat, and sleep, I didn't get much stitching done.  It was just too hot to concentrate on anything for long.  I am almost done with the floral "border" including Queen Stitches on the American Sampler.  I'll do the Colonial Gentleman in the center next - over one. 

Here is something - it's an I Spy quilt I made years ago.  I'm sending it out to oldest son so his kids can enjoy it for awhile.  Hopefully it will survive to be passed around in the family.  I had to buy tons of fat quarters to get all the different pieces for this quilt.

Hope you enjoyed!

Friday, June 29, 2012

Examing the Queen Stitch

You will mostly all remember that when I began working on my American Sampler, I was completely terrified of the Queen Stitch.  I actually said if I messed them up again (as I have always done in the past) I was going to convert all the Queens to crosses.  I was even more intimidated when I saw Valerie's (Shenandoah Sampler) Queens.  They were perfect.  Sigh!  When it came time to bite the bullet and do them, I didn't look at a single one of my reference books.  I'd done that in the past and it had not worked out well.  And then, amazingly (really REALLY amazingly) I did them - and they came out (well not) perfect, but very nicely.  And a few of you have asked how I did that.

So, here I am going to examine the Queen Stitch in detail.  My Queen stitch.  I'm not saying this is HOW TO DO THE QUEEN STITCH (imagine voice of God) but this is how I did the Queen Stitch and it's been workin' for me. 

I have consulted my two most liked reference books for stitching - The Red Book of Sampler Stitches, Eileen J. Bennett, The Sampler House, 2003, p. 46-47 and Encyclopedia of Needlework, Donna Kooler, Leisure Arts Publications, 2000, p. 71.  I like these books because the 1st seems to be very knowledgeable and the second is knowledgeable and has great pictures.  For some of this stuff, you're just going to have to suffer through some of my hand-drawn directions below.

"Red Book" diagrams you start at the far right and work your way left overall.  The first two vertical stitches are held in place by horizontal stitches that go from far right to left.  Two verticals are done to the middle then the next two are worked from the middle to the left and this time the horizontal stitches are worked from the left toward center.  See drawing with numbers:


"Encyclopedia" also works from the right to the left, but each horizontal stitch is worked from left to right across - no switching in the middle.  It also seems to indicate that overall, you would start stitching your Queen stitch area in the left and work, filling the area to the right.  See drawing with numbers:


Hmmmmm.

That's not what I did.  And maybe, just maybe, that's why they finally worked for me?

Queen Stitch, with Exceptions
First of all, I looked at where I wanted to go within the Queen stitch area.


Here in this first picture, you can see that I have another quadrant to complete.  We'll call these quadrants, NW, NE, SE and SW.  I need to stitch the SW quad.  I want to go toward the NE quad and then work my way back so I'm not traveling beneath and I don't constantly have to flip and hide my thread.  I have four Queen stitches that need to be done.  So, I want to stitch from the left side of the first Queen to the right.  I'm going to MIRROR the stitching in the diagram of the way I stitch.  I come up at 1 (the top of the entire stitch) and down at 2 (the bottom of the entire stitch).  Now, there are four holes across that I'll be working in.  For this example, they're hole 1, 2, 3 and 4 from left to right.  I want my first horizontal stitch to come up in hole 2 and go down in hole 1.  This way, I'm pulling the vertical thread where I want it to be instead of pushing it.  When you come up to do the horizontal stitch, don't pull the thread taut or it will be more difficult to place the stitch.  I just want to have a loop there that I can hook and I can snug things up a bit more as I finalize the stitch.


I come up and hook the vertical thread and swing over to go down in hole number 1


The first vertical set of four is complete.  I make the next vertical stitch only when I come up to do the horizontal stitch, I come up in hole 2 where I started the previous horizontal stitch.  That's because I can see where I've stitched better than I can see the linen.  The needle goes down in the center hole, two threads down from where the vertical stitches are starting from.  Sometimes I need to just nudge the thread over to the left or right so I can see where the horizontal thread came up to make sure I go over one thread of the linen and put the needle down.  On to the third vertical stitch - I do it the same way as the 2nd and for the same reason, I can see where I stitched and I can nudge the stitching thread over a bit to make sure I'm going down one thread of linen over.  When it comes to the 4th vertical stitch I complete the horizontal stitch by coming up on the inside and again, pulling the vertical thread to the outside to secure it where it is supposed to be.


Above you can see the completed Queen stitch.  I want to start the next one, moving toward the NE quad.  Where I ended the last Queen is going to be the bottom of this new Queen so I go up to the top and come down to the bottom to do my first vertical stitch.  Then go from the beginning again. 


Here is the second Queen completed.  Note that now the far right horizontal stitch is the top of the next Queen.  That's also where I stitched down on that one, so logically, I can't come up in the same place I just went down because that will pull the stitch out.  So I go to the bottom and create the first vertical stitch of the new Queen by going up.


Now all four "stitches' are done. 

All I did was basically stitch in a circle.  Truth to tell, I had to do these four the way I did because I'd come to the end of my thread and had to start a new piece.  Mostly when I'm stitching the Queens, I find it easiest to just do them in a row.  Once you get one Queen down and done right, she's sort of the guidepost for doing all the rest. 

I hope that I haven't made this as clear as mud.  The thing that I say you should keep in mind is where you are in the Queen area and where you want to go.  I'd let that guide me as to whether I start on the left or right.  I also found it most helpful to secure the two outermost vertical stitches by working their horizontal stitches from the inside out.  Some people may feel more comfortable securing those two outside stitches and then filling in the middle.

I say "stitches" because each Queen actually consists of  8 stitches.  I actually counted and there are a total of 1,378 Queen stitches in the American Sampler.  And, that's not counting the half Queens that help to shape each flower.  So, that's 11,024 stitches, by my count - plus!  The flower I'm working on here has 120 Queens all on it's own.   Oh, and just in case you didn't know, the Queen stitch is also called the Rococo stitch.  I much prefer "Queen". 

Please be sure to let me know whether I did this well or not.  If I helped you all, I'm really glad.  Otherwise, hope you enjoyed.

Monday, June 25, 2012

Revisiting an Old Friend


There's trouble brewing on the horizon as I go out and take down the blankets and towels I left hanging on the clothesline overnite.  Thunderstorm is almost here, but will usher in cool, fresh air for a few days.  Sebastian follows me.  It really amazes me how attached he seems to be.  Most cats, you walk out the door and they could care less.  I can't leave the room without Sebastian
following to see what kind of hijinks I'll be up to next.

He's found a stick in the yard and begins playing with it.  Quickly tiring himself out.


Since I finished Opus Magnusson, I picked up American Sampler again.  It feels like I'm revisiting an old friend since I am  no longer intimidated by the multitude of Queen stitches.


Here is the most recent progress; I finished the motifs on one side, all the way down to the urn.  Now I'm working my way back up the other side having started with the urn.  And here's an urn closeup -


The urn is worked in Florentine stitch and I thoroughly enjoyed stitching that.  You can see the outer border beginning to take shape in Rice stitch.

Here is what it looks like over all (a little droopy).


Turns out when I was stitching the strawberry flowers, I made a mistake.  I actually stitched them like strawberry flowers.  Turns out on the chart, each of them have four lavender spots.  Not sure yet whether I'll go back and put the lavender in.  I have also still not decided what verse or information I will put in the car touche below the arch.  There's plenty of time to decide, I think. 

Had some fun this weekend.  While my husband and I were out running an errand, we came upon a community yard sale.  This was a sweet find - for only two dollars:


Yeah, they're prestamped, but after working on the kit for The Chase sampler, I decided that pre-stamped wasn't SO bad.  The color scheme of soft pinks and sage greens is very 80's though.  The blocks are about 12 inches.  Only six come in a package so I am clearly not going to be able to make a quilt with them.  However, all six, or even just three, will make a nice table runner or table topper.  So that will eventually make it into the rotation.  Fun, huh?

Oh, and I also came up with another find (not pictured, but if you want me to in another post, I will).  You remember I got a new car?  Well the console goes up the center all the way, into the dash, so there's no place to put or hang a trash bag.  In my minivan I had a beautiful stitching tin that I would line with a grocery bag and that was my trash container.  So, a girlfriend (thanks Cheryl!!)  gave me the idea last week to use some sort of plastic container with a lid.  One of the yard sales I stopped at had a Tupperware bread keeper - with a snap-shut lid.  For another 2 bucks, I got it, came home, put a bag in it over the lip, snapped the lid shut and now I have a trash container that will sit on the floorboard on the passenger side, or the back, and if it falls over, no big deal - the trash will still stay inside!  Brilliant!

So, that's it from the thundery Eastern Panhandle.  Hope you enjoyed!

Sunday, June 17, 2012

Stitching Along

We've had some bumps in the road the last couple of weeks, but I've been stitching through them as (we all know) it is therapy.  I'm trying to be careful about my diet and trying to get more exercise as well; trying being the operative word.  I'll find out if I'm being successful when I go see the Dr. next month.

Anyhoo - here's what I've been up to -

More blocks on the Path to the Civil War:

Battlefield

Opposition

Devil's Puzzle

Mosaic

Connecticut

Nine Patch Checkerboard

Both Opposition and Connecticut were meant to be cut out using templates according to the instructions in the book.  I measured the angles of the triangles and did things differently.  For Opposition, I cut the six small 30 degree triangles then attached them to scraps that were long enough to extend out as far as I needed.  Sewed it all up and squared it up to 12.5 inches.  pretty much the same with Connecticut, although, different angles.  Also, used full squares to make Nine Patch Checkerboard - except for the four corners.  This time, I cut the square down, but it was still missing its corners.  I used the triangles that were the product of squaring-up to sew on as the corner ('cause they're smaller at the corners than at the sides).  Savvy quilters will see that I lost a couple of my points on Mosaic.  Alas, my perfect mojo seems to have deserted me.

I've also been working on this; I'm calling it my Hexie Project:


I saw a piece on Sewing with Nancy, this Texas quilt artist - a man - was doing these full size quilts.  He'd learned the technique from the book One Block Wonders.  His quilts were astonishing!  And I thought, oh, I have to try that.  He used large scale prints to come up with his quilts.  Do you know it is not easy to find large scale prints these days?  But I found this:


I quite like the colors and this is the fabric that so far, I've made those six hexies with.  I do not plan to make a full size quilt.  I'm going for a table runner.

Then, there's this:


A friend of mine found it at a yard sale and bought it for me.  Isn't she sweet?  I quite like the design on the cover.  The quilts are meant to be made from scraps no bigger than five inches.  I have quite a lot of scraps and even if I don't make a full size quilt, I can do another table runner just to play.

Finally, I had a little retail therapy.  This one was a gift from my husband.  We'd gone in search of a yard sale a friend had told me about that had lots of stitching and sewing stuff.  We didn't find that, but we found a church sale.  Those can be quite wonderful.  And I was walking along and here was this older couple and she had this box on the table and I went WHOA!  I asked her how much, she told me and I said, can you wait on that for me?  She nodded.  I turned around and scanned the crowd, saw my husband, flagged him over and he came over to me saying "Did you see that on the table?"  I said yes and asked if I could have it.  Now, I'm not the demure, submissive wife, not by a long shot.  I didn't have the funds, that's all.  He asked me if it was a good price and I said yes.  He asked me if I wanted to haggle and I said no.  The price was that good.  So, I turned around and said to the lady, I'll take it!  And here it is -


It's a Singer, 1956, Model 99.  I have been doing a little research on it.  It's not a Featherweight.  They call it a 3/4 size.  I haven't run it yet, but if it doesn't run, I'm sure my husband or my shop can make it run quite well.  I've wanted one of these for quite some time.  That nice lady, she was sort of sad to see it go.  She told me they'd bought it in 58 or 59 - she couldn't remember which, but it was right after they got married.  Her husband was quite happy to wrap it up and hand it off to my husband - no emotional attachment there.  I gave the money to her though.  Just to make the pain of parting a little easier.

So, that's it.  Hope you enjoyed.